 I consider Andersen windows to be the best, especially the Woodwright and A (Architectural) series windows, but one problem with all Andersen windows in the past has been the 3/4″ “Trimline” exterior, unacceptable aesthetically, especially here in New England where even new houses have traditional exterior wide exterior casings.
My solution has been to make flat exterior casings from wood or PVC trim boards and attach them with stainless screws around the window edge as a picture frame, with an optional sill extension of the same material, then sealing the joints with caulk. To cut out for the retrofit casings, screw a straight board over the existing siding as a guide for your saw. The board should be on the “save” side and set in depth and position so that the removed siding is exactly the width of the new casing applied. Finish the corners with a scroll saw.
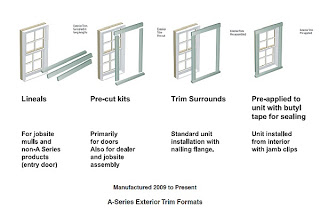
 Andersen offers exterior trim kits for their 400 and Architectural series windows. The pieces are constructed of fibrex and are designed to snap into the special nailing flanges that are used to secure windows in place. There is a choice of brickmold, 3 1/2″ or 4 1/2″ casings as well as a sill nose. Application diagram

This week I am installing a dozen Andersen designer windows in a very old New England Colonial. I ordered the windows with the trim kits already assembled and snapped (temporarily) into place. After pulling out the old windows and storms I re-framed the rough opening (which had never been framed at all– holes had been cut in the wall for the windows with no sill or header!). I temporarily secure the window in the rough opening making sure it is plumb and square, and trace the outside of the applied exterior casing, I set the window aside and removed the casing assembly, which easily unsnaps from the frame. I cut the cedar shakes along the line I had traced and remove the waste. (You can also measure and use a straightedge).
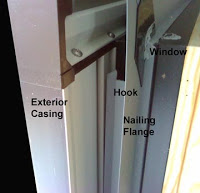
The windows are ordered with extended nailing flanges that have a hooked edge to hold the casings. After attaching the window back in the opening with the nailing fins, I caulk all around the cutout and snap the exterior trim into place. That takes less than a minute. I put a thin line of matching caulk along the cutout line, touch up the paint on the siding, and the windows are finished on the outside. They look great.
View an installation video below for the new Andersen exterior casings

We are considering using this trim on our 1907 victorian farmhouse. (You can see it on my blog.) Glad to see that the installation goes so quickly!
LikeLike